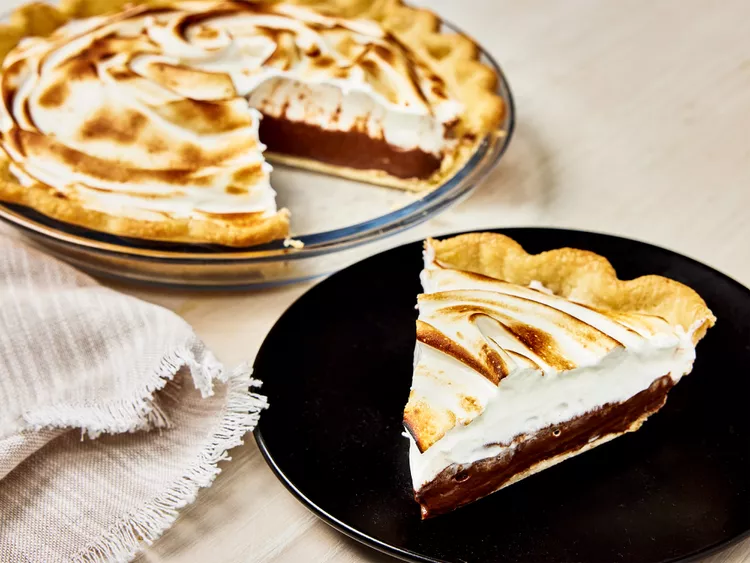
Mom’s Chocolate Meringue Pie Recipe: Old-Fashioned, Rich and Creamy
Mom’s Chocolate Meringue Pie recipe is the kind of classic dessert that never really goes out of style. A crisp, flaky pie crust holds a rich homemade chocolate custard, while a generous layer of fluffy meringue bakes until lightly golden on top. Every slice delivers three distinct textures: buttery pastry, silky chocolate filling, and soft, cloud-like meringue.
This old-fashioned chocolate meringue pie is particularly good for holidays, Sunday dinners, birthdays, and family gatherings. Although its impressive layers make it look elaborate, the recipe relies on straightforward ingredients and traditional techniques.
The secret is to treat each layer separately. Fully baking the crust prevents a soggy bottom. Cooking the chocolate custard until it bubbles gives the filling enough structure to slice cleanly after chilling. Finally, spreading freshly whipped meringue over the filling while it is still hot helps the topping adhere to the chocolate layer.
The result is a deeply chocolatey homemade pie with the nostalgic character of a family recipe and the polished finish of a bakery dessert.
Prep time: 30 minutes
Cook time: 35 minutes
Cooling and chilling: 4 hours
Total time: About 5 hours 5 minutes
Servings: 8
Yield: One 9-inch pie
Why This Mom’s Chocolate Meringue Pie Recipe Works
A great chocolate meringue pie depends on balance. The filling needs enough chocolate intensity to stand up to the sweet meringue without becoming overly bitter, while the crust needs to remain crisp beneath the creamy custard.
This recipe uses both unsweetened cocoa powder and semisweet chocolate. Cocoa provides deep chocolate flavor, while melted chocolate adds richness and a smoother mouthfeel.
Cornstarch thickens the custard and helps it hold its shape after chilling. Egg yolks contribute richness, butter gives the finished filling a glossy texture, and vanilla rounds out the cocoa flavor.
The remaining egg whites become the meringue, creating a practical recipe that uses the separated eggs efficiently.
Ingredients for Chocolate Meringue Pie
For the Crust
- 1 unbaked 9-inch pie crust, homemade or refrigerated
- Pie weights or dried beans, for blind baking
For the Chocolate Pie Filling
- 3/4 cup granulated sugar
- 1/4 cup unsweetened cocoa powder
- 1/4 cup cornstarch
- 1/4 teaspoon fine salt
- 2 3/4 cups whole milk
- 4 large egg yolks
- 2 ounces semisweet chocolate, finely chopped
- 2 tablespoons unsalted butter
- 1 1/2 teaspoons pure vanilla extract
For the Meringue Topping
- 4 large egg whites, at room temperature
- 1/4 teaspoon cream of tartar
- 1/2 cup granulated sugar
- 1/2 teaspoon pure vanilla extract
How to Make Mom’s Chocolate Meringue Pie
1. Blind-Bake the Pie Crust
Preheat the oven to 375°F.
Fit the pie dough into a 9-inch pie plate. Trim and crimp the edges as desired. Line the pastry with parchment paper or aluminum foil and fill it with pie weights or dried beans.
Bake for 15 minutes.
Carefully lift out the parchment and weights. Return the uncovered crust to the oven and bake for another 8 to 12 minutes, until the bottom appears dry and the pastry is lightly golden.
Remove the crust from the oven and reduce the temperature to 350°F.
Do not skip blind-baking. Because the chocolate custard is cooked on the stovetop, the crust needs to be baked before the filling is added.
2. Combine the Chocolate Filling Ingredients
In a medium heavy-bottomed saucepan, whisk together the granulated sugar, cocoa powder, cornstarch, and salt.
Gradually whisk in about 1/2 cup of the milk. Once the mixture is smooth, slowly whisk in the remaining milk.
Adding the milk gradually prevents pockets of dry cocoa or cornstarch from forming.
3. Cook the Chocolate Custard
Place the saucepan over medium heat.
Cook while whisking frequently, paying particular attention to the bottom and corners of the saucepan.
As the mixture heats, it will gradually become thicker. Once it begins bubbling gently, cook for approximately 1 minute while whisking constantly.
The custard should be thick enough for whisk marks to remain briefly visible on its surface.
Remove the saucepan from the heat.
4. Temper the Egg Yolks
Place the egg yolks in a medium heatproof bowl and whisk until smooth.
Slowly pour about 1 cup of the hot chocolate mixture into the egg yolks while whisking continuously.
This process, known as tempering, gradually warms the yolks so they can be incorporated without scrambling.
Pour the tempered egg mixture back into the saucepan.
5. Finish Cooking the Filling
Return the saucepan to medium-low heat.
Cook for about 2 minutes, whisking constantly, until the custard returns to a gentle bubble and becomes thick, glossy, and smooth.
Remove from the heat.
Immediately add the chopped semisweet chocolate, butter, and vanilla. Stir until the chocolate and butter have completely melted.
Pour the hot chocolate filling into the baked pie shell and smooth the surface.
How to Make the Fluffy Meringue Topping
6. Whip the Egg Whites
Place the egg whites in a clean, dry glass or metal mixing bowl.
Beat with an electric mixer on medium speed until foamy. Add the cream of tartar and continue beating until the whites form soft peaks.
The cream of tartar helps stabilize the egg-white foam, making the finished meringue more reliable.
7. Gradually Add the Sugar
Increase the mixer to medium-high speed.
Add the sugar about 1 tablespoon at a time, beating well between additions.
Continue whipping until the meringue becomes glossy and holds firm peaks. Beat in the vanilla just until incorporated.
To check the texture, rub a tiny amount between two clean fingertips. The meringue should feel mostly smooth rather than distinctly grainy.
Avoid overbeating. Properly whipped meringue should look glossy and supple rather than dry or clumpy.
8. Spread the Meringue Over the Hot Filling
Spoon the freshly whipped meringue directly onto the hot chocolate filling.
Start around the outside of the pie. Spread the meringue all the way to the crust, making sure there are no gaps around the perimeter.
Once the edge is completely sealed, spread the remaining meringue over the center.
Create decorative peaks and swirls with the back of a spoon.
This seal is important. Anchoring the meringue to the crust helps prevent it from shrinking away from the edges during baking.
9. Bake Until Golden
Bake the assembled pie at 350°F for about 15 minutes, or until the meringue is cooked through and its peaks are attractively golden.
The meringue can brown quickly toward the end, so begin checking it several minutes before the baking time is complete.
Remove the pie from the oven and place it on a wire rack.
10. Cool Before Slicing
Allow the chocolate meringue pie to cool at room temperature for approximately 1 hour.
Transfer it to the refrigerator and chill for at least 3 hours before serving.
The chilling period is essential because the chocolate custard continues to set as it cools. Cutting the pie too soon can cause the filling to spread rather than hold a neat wedge.
For clean slices, use a sharp knife and wipe the blade between cuts.
Expert Tips for Perfect Chocolate Meringue Pie
Use Whole Milk for the Creamiest Filling
Whole milk gives the chocolate custard a fuller texture without making it excessively heavy. Two-percent milk can work, but the finished filling will be slightly less rich.
Cook the Cornstarch Properly
A custard that merely gets warm is not enough. It needs to reach a gentle bubble so the cornstarch can fully thicken the filling.
Keep the Egg Whites Completely Free of Fat
Even traces of egg yolk, butter, or grease can make egg whites difficult to whip. Use a spotless bowl and clean beaters.
Add the Sugar Slowly
Gradual sugar incorporation creates a finer, more stable meringue. Adding all of the sugar at once can weigh down the egg-white foam.
Put Meringue on Hot Filling
Do not wait for the chocolate layer to become cold. Spreading meringue over hot filling helps the two layers bond.
Seal the Meringue to the Crust
This is one of the easiest ways to prevent meringue shrinkage. Make sure the topping touches the crust around the entire circumference of the pie.
Chocolate Meringue Pie Variations
Dark Chocolate Meringue Pie
Replace the semisweet chocolate with bittersweet chocolate for a deeper, less sweet chocolate profile.
Espresso Chocolate Pie
Add 1 teaspoon instant espresso powder to the dry filling ingredients. A small amount of coffee intensifies the chocolate flavor without overwhelming the dessert.
Milk Chocolate Pie
Substitute milk chocolate for the semisweet chocolate. Because milk chocolate contains more sugar, reduce the granulated sugar in the filling by 1 to 2 tablespoons if you prefer a more balanced sweetness.
Gluten-Free Chocolate Meringue Pie
Use a reliable 9-inch gluten-free pie crust and confirm that packaged ingredients are certified gluten-free when necessary. The chocolate custard itself does not require flour.
Lighter Chocolate Filling
Two-percent milk can replace whole milk. The filling will still set, although it will have a slightly less luxurious texture.
Why Does Chocolate Meringue Pie Get Watery?
A layer of moisture between the chocolate filling and meringue is sometimes called weeping. It can occur when moisture escapes from the meringue or when the topping does not properly adhere to the filling.
For better results, spread the meringue onto the chocolate filling while the custard is still hot. Seal the topping completely against the crust and bake it promptly.
Small beads of moisture may still appear after extended refrigeration. This is a natural characteristic of meringue rather than necessarily an indication that the pie was prepared incorrectly.
Serving Suggestions
Mom’s Chocolate Meringue Pie is best served chilled, although taking it out of the refrigerator about 10 to 15 minutes before serving allows the chocolate flavor to become more expressive.
The pie is rich enough to stand alone, so elaborate toppings are unnecessary. For contrast, serve slices with fresh raspberries or strawberries. Their acidity cuts through the sweetness of the custard and meringue.
Coffee and espresso also pair particularly well with chocolate meringue pie. The roasted bitterness of coffee complements the cocoa while balancing the sweetness of the topping.
For Thanksgiving, Christmas, Easter, or other celebrations, place this chocolate pie alongside fruit pies or lighter desserts to offer guests a contrasting flavor and texture.
How to Store Chocolate Meringue Pie
Once cooled, chocolate meringue pie should be refrigerated because it contains dairy, eggs, and cooked custard.
Store the pie loosely covered in the refrigerator for up to 3 days. Avoid pressing plastic wrap directly onto the meringue, as it can adhere to the delicate surface.
For the best texture and appearance, enjoy the pie within 24 to 48 hours.
Freezing is not recommended. Both custard and meringue can release moisture after thawing, potentially leaving the filling watery and the topping soft or spongy.
Make-Ahead Instructions
The pie crust can be blind-baked one day ahead. Once completely cool, cover it and keep it at room temperature until you are ready to make the filling.
The completed pie can also be prepared the day before serving. Bake it, cool it for about 1 hour, then refrigerate until thoroughly chilled.
This makes Mom’s Chocolate Meringue Pie especially convenient for holidays because the dessert can be finished before the main meal needs your attention.
Nutrition Information
Estimated nutrition per serving, based on 8 slices:
| Nutrient | Amount |
|---|---|
| Calories | 410 kcal |
| Protein | 7 g |
| Fat | 17 g |
| Saturated Fat | 8 g |
| Carbohydrates | 59 g |
| Fiber | 2 g |
| Sugar | 39 g |
| Sodium | 230 mg |
Nutrition values are approximate and can vary depending on the specific pie crust, chocolate, milk, and other ingredients used.
Frequently Asked Questions
Can I make chocolate meringue pie the night before?
Yes. Chocolate meringue pie can be made the day before serving. Refrigerating it overnight also gives the custard plenty of time to set, making the pie easier to slice.
Why is my chocolate pie filling runny?
Runny chocolate filling is commonly caused by insufficient cooking or cutting the pie before it has chilled completely. The cornstarch mixture needs to reach a gentle boil, and the completed pie needs several hours of refrigeration.
Can I use chocolate chips?
Yes. Semisweet chocolate chips can replace chopped chocolate. A chopped baking bar generally melts more readily, but either option can work.
How do you keep meringue from shrinking?
Spread the meringue onto the filling while it is still hot and seal it directly against the crust around the entire edge. Do not leave exposed filling between the meringue and crust.
How long does chocolate meringue pie last?
Stored correctly in the refrigerator, it can be kept for up to 3 days. However, the meringue has its best texture during the first 1 to 2 days.
Does chocolate meringue pie need to be refrigerated?
Yes. Because this pie contains a milk-and-egg custard, leftovers should be kept refrigerated rather than stored at room temperature.
A Classic Homemade Chocolate Pie Worth Making
A properly made Mom’s Chocolate Meringue Pie recipe is all about contrast: crisp pastry against creamy chocolate custard, followed by a soft layer of sweet, golden meringue.
Using cocoa powder and semisweet chocolate gives the filling satisfying depth, while butter and egg yolks create its smooth, luxurious finish. The meringue provides both visual drama and a lighter texture that keeps the chocolate filling from feeling too heavy.
Most importantly, this is a recipe where traditional technique makes a noticeable difference. Blind-bake the crust until crisp, cook the custard until properly thickened, spread the meringue over the filling while it is hot, and give the finished pie enough time to chill.
Follow those fundamentals and you will have a classic old-fashioned chocolate meringue pie with a flaky crust, silky center, golden topping, and clean slices—the kind of homemade dessert that deserves a permanent place in the family recipe collection.