The Ultimate Chicken Tender Parmesan Casserole: A Modern Weeknight Masterpiece
The classic Italian-American Chicken Parmesan—or Pollo alla Parmigiana—is a triumph of culinary textures and contrasting flavors. When executed flawlessly, it offers an incredible sensory experience: the clean crunch of a golden-brown breaded crust, the vibrant acidity of a slow-simmered tomato sauce, and the rich, pull-apart elasticity of melted mozzarella cheese. Yet, the traditional preparation is notoriously demanding. It requires multiple cutting boards, a messy three-dish dredging station, batch-frying in splattering oil, and rapid assembly before the crust loses its structural integrity.
This Chicken Tender Parmesan Casserole offers a sophisticated reimagining of the iconic dish, re-engineered specifically for the modern home kitchen. By pivoting from large, uneven chicken breasts to uniform, naturally tender chicken strip cuts, we eliminate the need for pounding poultry flat and radically decrease prep time.
More importantly, this method solves the oldest flaw of the traditional baked casserole: the dreaded soggy crust. By using a clever layering strategy—par-baking seasoned, juicy chicken tenders directly in a rich marinara base, then crowning them with a tailored, butter-toasted herbed Panko crust—you achieve a perfect structural balance. The top stays profoundly crispy, while the meat beneath absorbs the aromatic essence of garlic, basil, and molten cheese. This is high-reward comfort food, streamlined without a single compromise in flavor or technique.
Ingredients
To achieve a restaurant-quality result, focus heavily on ingredient selection. Because this recipe relies on a concise lineup of components, the caliber of your cheese and sauce will directly dictate the final flavor profile.
For the Chicken Base:
-
2 pounds fresh chicken tenders, trimmed of tough white tendons
-
2 tablespoons extra-virgin olive oil
-
1 teaspoon high-quality garlic powder
-
1 teaspoon onion powder
-
1 teaspoon dried Sicilian oregano
-
1/2 teaspoon kosher salt
-
1/4 teaspoon freshly cracked black pepper
For the Tomato & Cheese Layers:
-
24 ounces premium marinara sauce (one standard jar; choose a low-sugar brand prioritizing San Marzano tomatoes and extra-virgin olive oil)
-
8 ounces low-moisture, whole-milk mozzarella cheese, shredded by hand (approx. 2 cups)
-
1/2 cup Parmigiano-Reggiano cheese, finely grated on a microplane
For the Crispy Herbed Topping:
-
2 cups plain Panko breadcrumbs (Japanese flake breadcrumbs offer superior surface area for maximum crunch)
-
3 tablespoons unsalted butter, melted
-
1 tablespoon dried Italian seasoning (a balanced blend of rosemary, thyme, basil, and oregano)
-
1/4 teaspoon garlic powder
-
2 tablespoons fresh flat-leaf Italian parsley, finely minced (reserved for final garnish)
Step-by-Step Instructions
This method employs a precise baking sequence designed to fully cook the poultry while maintaining a stark contrast between the velvety sauce and the crunchy topping.
Step 1: Preheat and Prepare the Oven
Position your oven rack to the center slot and preheat the oven to 400°F (204°C). Lightly coat a 9×13-inch ceramic or glass baking dish with extra-virgin olive oil or a high-heat cooking spray.
Step 2: Trim and Season the Chicken Tenders
Using a sharp pairing knife or kitchen shears, trim any stubborn tendons from the narrow tips of the chicken tenders. Pat the tenders completely dry with paper towels; removing surface moisture is essential for the olive oil and spices to adhere correctly. Place the chicken in a large bowl, drizzle with 2 tablespoons of olive oil, and sprinkle uniformly with the garlic powder, onion powder, dried oregano, kosher salt, and cracked black pepper. Toss until the chicken strips are evenly glossy and seasoned.
Step 3: Construct the Base Layer
Pour exactly 1/2 cup of your premium marinara sauce into the bottom of the prepared baking dish, using the back of a spoon to spread it into a paper-thin layer. This prevents the chicken from sticking or scorching on the bottom. Arrange the seasoned chicken tenders over the sauce in a tight, single layer. They should sit snugly against one another without overlapping significantly, ensuring even heat distribution.
Step 4: Layer Sauce and Cheeses
Pour the remaining marinara sauce evenly across the chicken tenders, covering them thoroughly to seal in their natural juices. Scatter the finely grated Parmigiano-Reggiano over the sauce layer—this introduces a sharp, salty depth of flavor. Follow immediately with an even layer of the shredded low-moisture mozzarella cheese.
Step 5: Mix the Crunchy Panko Topping
In a separate small mixing bowl, combine the Panko breadcrumbs, melted unsalted butter, Italian seasoning, and 1/4 teaspoon of garlic powder. Toss with a fork until the melted butter is thoroughly distributed and the breadcrumbs resemble coarse, golden wet sand. Scatter this mixture evenly over the top of the mozzarella cheese layer, covering it completely.
Step 6: Bake to Golden Perfection
Bake uncovered at 400°F (204°C) for 25 to 30 minutes.
Critical Safety & Visual Cues: Watch for the edges of the casserole to bubble vigorously with red sauce, while the Panko crust transforms into a rich, deep mahogany-gold. To ensure accuracy, insert a digital instant-read thermometer into the thickest part of a center chicken tender; it must read exactly 165°F (74°C).
Step 7: Rest, Garnish, and Serve
Remove the casserole from the oven. Allow the dish to rest undisturbed for 5 to 10 minutes at room temperature. This resting phase allows the bubbling proteins and cheese to set, making it easy to slice clean portions without the sauce running. Just before serving, dust the top generously with the minced fresh flat-leaf parsley.
Expert Tips & Variations
Professional Cooking Insights
-
The Anti-Caking Agent Trap: Never buy pre-shredded mozzarella cheese in a bag. Commercial manufacturers coat pre-shredded cheeses with cellulose and potato starch to prevent clumping. This coating interferes with the melting process, causing the cheese to brown prematurely and take on a grainy texture. Grating a block of whole-milk mozzarella by hand ensures a smooth, silky cheese pull.
-
Managing Steam: If you prefer an ultra-shattered, ultra-crispy crust, bake the casserole without the Panko topping for the first 15 minutes. Then quickly pull the dish out, scatter the buttered Panko over the hot cheese, and return it to the oven for the final 15 minutes. This minimizes the time the breadcrumbs spend soaking up moisture from the boiling sauce.
Ingredient Substitutions and Dietary Adaptations
If you are cooking around dietary restrictions or looking to switch up the protein, use this straightforward adaptation chart:
| Original Ingredient | Proposed Alternative | Target Dietary Strategy |
| Standard Panko | Crushed pork rinds or fine almond flour mixed with extra parmesan | Low-Carb / Ketogenic |
| Chicken Tenders | Firm tofu slabs (pressed dry, sliced into strips, and seasoned) | Vegetarian |
| Standard Panko | Certified gluten-free Panko or crushed gluten-free crackers | Gluten-Free |
| Mozzarella & Butter | Vegan mozzarella shreds and extra-virgin olive oil | Dairy-Free / Plant-Based |
Serving Suggestions
This casserole is a robust, comforting anchor for a meal, allowing you to go traditional or keep things light depending on your side dishes.
-
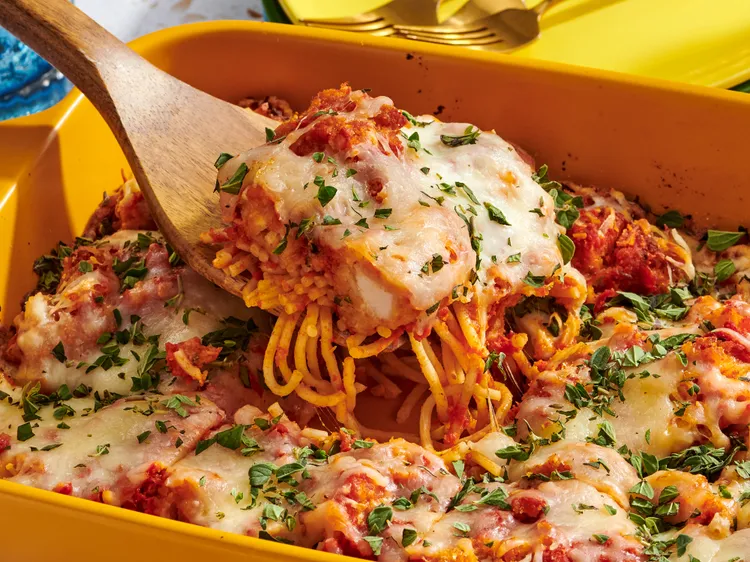
The Italian-American Feast: Spoon a generous helping of the casserole over a bed of al dente spaghetti, rigatoni, or penne pasta that has been lightly tossed in a splash of warm marinara and olive oil.
-
The Low-Carb Alternative: Pair each serving with roasted spaghetti squash strands or freshly spiraled zucchini noodles (zoodles). The natural sweetness of the squash balances the acidity of the tomato sauce beautifully.
-
The Acidic Counterpart: Because this dish features rich cheese and savory oils, it pairs perfectly with a bright, crisp green salad. A classic Caesar salad with a sharp, lemony garlic dressing or an arugula salad dressed in a simple red wine vinaigrette cuts through the richness beautifully.
-
Garlic Bread: A warm, toasted baguette rubbed with raw garlic and butter is perfect for dipping into any extra sauce left behind.
Storage & Make-Ahead Notes
Because this dish relies on stable, low-moisture cheeses and sturdy chicken cuts, it holds up beautifully to meal prepping, freezing, and reheating.
Refrigeration & Reheating Protocols
-
Storage: Allow any leftovers to cool completely to room temperature. Transfer the remains into an airtight glass container and store in the refrigerator for up to 4 days.
-
Reheating: To prevent the chicken from drying out or the cheese from turning oily, avoid the microwave if possible. Instead, place individual portions in an oven-safe dish, tent loosely with aluminum foil to trap moisture, and heat in a 350°F (177°C) oven or toaster oven for 12 to 15 minutes until warmed through. Remove the foil for the final 2 minutes to restore the crispiness of the Panko.
Freezing Guidelines
This dish can be frozen successfully if assembled in a disposable aluminum baking pan.
-
Freezing Unbaked: Assemble the casserole completely through the cheese layer, but do not add the buttered Panko topping (as frozen breadcrumbs will turn mushy upon thawing). Wrap the pan tightly with a double layer of plastic wrap, followed by a heavy layer of aluminum foil. Freeze for up to 3 months.
-
Thawing and Baking from Freezing: Thaw the pan completely in the refrigerator overnight. Before baking, prepare a fresh batch of buttered Panko breadcrumbs, scatter them over the top, and bake at 400°F (204°C) as instructed. You may need to add an extra 5 to 10 minutes to the total baking time since the ingredients will start cold.
Nutrition Information
The following values are estimated calculations based on one standard serving, assuming the entire recipe is divided into 6 equal portions.
-
Calories: 410 kcal
-
Protein: 42 g
-
Fat: 18 g
-
Saturated Fat: 8 g
-
Carbohydrates: 19 g
-
Fiber: 2 g
-
Sugar: 5 g
-
Sodium: 890 mg
Kitchen Production Timeline
If you are orchestrating a multi-course dinner or simply mapping out a hectic weeknight evening, use this step-by-step production timeline to manage your time efficiently.
| Phase | Culinary Tasks | Active/Passive Time |
| Phase 1: Prep | Preheat oven to 400°F; hand-shred mozzarella; trim chicken tenders of tendons. | 10 Minutes (Active) |
| Phase 2: Assemble | Season chicken; layer sauce, chicken, cheeses, and buttered Panko topping in dish. | 5 Minutes (Active) |
| Phase 3: Bake | Place casserole on the center rack; bake uncovered until chicken hits 165°F. | 25–30 Minutes (Passive) |
| Phase 4: Rest | Let casserole stand at room temperature to allow cheese and sauce matrix to set. | 5–10 Minutes (Passive) |
| Total Time | From raw ingredients to a beautiful family dinner | 45–55 Minutes |